General guidelines/checklists for building apps. Feel free to edit.
We will try to list all the necessary steps needed here, but there will be also some external links in the bottom of this page. If you get an error or have a problem, check if there is a solution in the bottom of this page.
Preparements and building
Test that the app runs on the target device before building. Navigate to the project folder and run from command line (replacing ios-device with android-device for android): meteor run ios-device –settings settings-dev.json –mobile-server localhost:3000
To build:
Make sure that latest version is deployed to prod. Deploying to prod needs to be done while building, because if there is an earlier version of the application in the server, the app will “update” to that one with hot code push instead of the latest version that is built.
Bump version number in
mobile-config.js. The version number should be higher than the previous build, or else the store will not accept it.Run build command. In the project directory run
meteor build <build-output-directory> --server <host>:<port> --mobile-settings <settings-file>. For example:meteor build ../unitaitostore –mobile-settings settings-prod.json –server https://unitaito.liana.fi
Preparing for Android Play Store
As a result of running meteor build, there will be one or two APK files in folder /build-output-directory/android/project/build/outputs/apk/. Next you will have to do the following steps:
Open terminal and navigate to folder with freshly built apks.
Copy the apps keystore from 1Password next to the apks, passphrase should be there also. (Or create new if the app has not been yet build for store, remember to store keystore password in this case or you will not be able to update it afterwards).
Sign the apk with jarsigner with the following command
jarsigner -verbose -sigalg SHA1withRSA -digestalg SHA1 <release-unsigned>.apk <app-name-from-keystore>
For example:jarsigner -keystore unitaito.store -verbose -sigalg SHA1withRSA -digestalg SHA1 android-armv7-release-unsigned.apk unitaitoRun zipalign with command
$ANDROID_HOME/build-tools/<build-tools-version>/zipalign 4 release-unsigned.apk <your-app-name>.apkFor example:/usr/local/opt/android-sdk/build-tools/25.0.2/zipalign 4 android-x86-release-unsigned.apk x86.apk
After you have built and before submitting to stores, run the app on an actual device and click around to see that everything seems to be in place (copy the APK to your device and open the APK from the device).
Submitting for Android Play Store
You need to log in to Google developer console with an account that is the owner of the app or has rights to create releases for the app.
Log in to the Google developer console. https://play.google.com/apps/publish/
Select your team and open the app.
Go to release management
Release management->App releases->Manage production/beta-> Create releaseUpload apks. Click
Upload apk, and upload the jarsigned and zipaligned apks to the store.Check that everything is correct, click save and review.
To publish, click confirm rollout.
Preparing for iOS App Store
As a result of running meteor build, you can find an XCode project in <build-output-directory>/ios/project. There are a couple of things that need to be configured in XCode:
Open the XCode project in the build directory.
Select right capabilities from
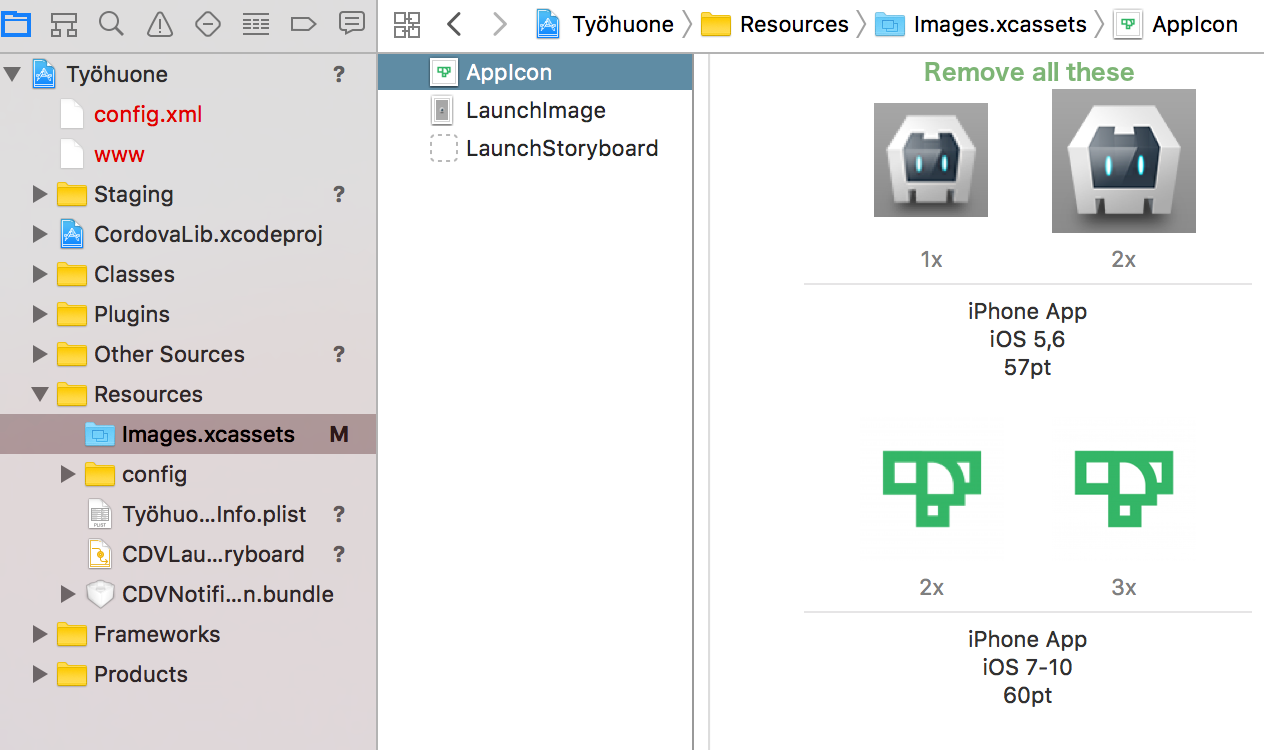
Capabilities-tab. Some apps should have a note about the capabilities in the projects GitHub readme. These capabilities also have to have corresponding certificates created from Apple Developer Account (https://developer.apple.com/account/ios/certificate/).Remove cordova icons from resources Go to
resources->Images.xcassets->AppIconand remove any Cordova icons. ImageSelect team for signing. In
General-tab ->SigningselectAutomatically manage signingand select the right team for signing the app. You need to be part of the development team and have the rights to submit an app to do this.
After you have configured the things mentioned above upload to store. Before submitting to stores, run the app on an actual device and click around to see that everything seems to be in place.
Submitting to iOS App Store
Run app in an iPhone. Attach the iPhone with USB. In menu click
Product->Run.Archive the build. In menu click
Product->Archive.Validate app. A new window opens. Click
validate. Choose team, and click validate.Upload to App Store. Click
Upload to App Store. Same steps as in validation.Log in to iTunesConnect. After upload it takes a few minutes for the app to be processed. Go to https://itunesconnect.apple.com/, log in to your account.
Select your team and open the app. Under
My apps.Publish from iTunesConnect For testflight: under
Testflight, select your build, add testers and respond to any export compliance questions. If you have external testers, clickSubmit for revieworStart testing. For app store: underApp Storeclickversion or platform->iOSand give all necessary information, clickSaveandSubmit for review.
External links
For reference, instructions for building and submitting to stores can also be found in following links:
Meteor instructions:
https://guide.meteor.com/mobile.html#building-for-production
Apple:
https://developer.apple.com/library/ios/documentation/IDEs/Conceptual/AppDistributionGuide/SubmittingYourApp/SubmittingYourApp.html
https://developer.apple.com/library/content/documentation/IDEs/Conceptual/AppDistributionGuide/Introduction/Introduction.html
Create release for Play Store:
https://support.google.com/googleplay/android-developer/answer/7159011?hl=en